Over the course of this three part series, I have laid out extensions I wrote for adding PRSIM like plugins to a standard Blazor application. I promised to finish things up by covering a sample application. Here goes …
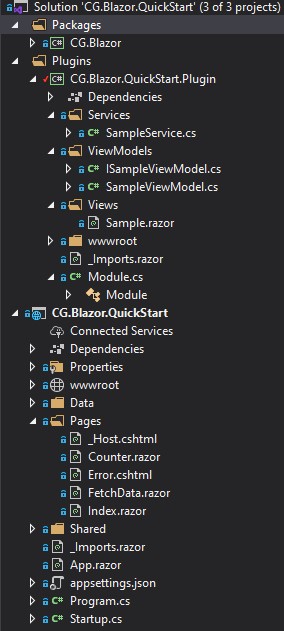
The sample solution has the following structure:

There are three projects in the solution: (1) the CG.Blazor project itself, (2) the CG.Blazor.QuickStart.Plugin project, and (3) the CG.Blazor.QuickStart sample Blazor application. Let’s cover the sample application first, then I’ll cover the plugin.
The sample started as a plain vanilla server-side Blazor application. I changed as little as I could get away with, and still be able to demonstrate my extensions. Here are the changes I made:
In the _Host.cshtml file, I added the following lines to the head section:
@(Html.Raw(BlazorResources.RenderStyleSheetLinks()))
@(Html.Raw(BlazorResources.RenderScriptTags()))
In the App.razor file, I added the AdditionalAssemblies attribute to the Router tag, like this:
<Router AppAssembly="@typeof(Program).Assembly"
        AdditionalAssemblies="@BlazorResources.RoutedAssemblies">
<!-- the rest is redacted for clarity -->
</Router>
I then added a new link to the NavMenu.razor file, in the Shared folder, like this:
<div class="@NavMenuCssClass" @onclick="ToggleNavMenu">
    <ul class="nav flex-column">

        <!-- the existing links redacted, for clarity -->

        <li class="nav-item px-3">
            <NavLink class="nav-link" href="sample">
                <span class="oi oi-beaker" aria-hidden="true"></span> Sample
            </NavLink>
        </li>

    </ul>
</div>
The next thing I did was add the following code to the Startup class:
public void ConfigureServices(IServiceCollection services)
{
    services.AddPlugins(Configuration);
    services.AddViewModels();
}

public void Configure(IApplicationBuilder app, IWebHostEnvironment env)
{
    app.UsePlugins(env);
}
Finally, I added the following to the appsettings,json file:
{
  "Plugins": {
    "Modules": [
      {
        //"Assembly": "CG.Blazor.QuickStart.Plugin",
        "Assembly": "../../../CG.Blazor/samples/CG.Blazor.QuickStart.Plugin/bin/Debug/netcoreApp3.1/CG.Blazor.QuickStart.Plugin.dll",
        "Routed": true,
        "StyleSheets": [
          "/styles/styles.css"
        ],
        "Scripts": [
          "/scripts/scripts.js"
        ],
        "EntryPoint": "CG.Blazor.QuickStart.Plugin.Module"
      }
    ]
  }
}
… And, that’s it. Not bad, right? Everything else I’ll cover in this blog post is for the plugin project. We’re done with changes to the actual Blazor project. Down the road, I’d like to figure out a way to remove these manual code changes, somehow, but I’ve yet to figure that out.
Let’s move on to the plugin project. The sample actually demonstrates both the plugins and my MVVM extensions. Because of that, I’ll also be covering the additional MVVM code, as well. No worries though, it’s not much code, either way.
We’ll start with the Module class, which is the plugin’s entry point and looks like this:
public class Module : IModule
{
    public void Initialize(
        IServiceCollection serviceCollection
        )
    {
        serviceCollection.AddSingleton<SampleService>();
    }
}
A instance of this class is created by my plugin extensions as the Blazor application is starting up. Assuming the plugin is properly configured, my extensions load the plugin, create an instance of this class, and then call the Initialize method, passing in the application’s service collection as a parameter. As shown in the code, I take the opportunity to register a private service that I’ll be using later on, for the sample.
The service itself looks like this:
public class SampleService
{
    public string GetTimeNow()
    {
        return $"{DateTime.Now}";
    }
}
So, it’s a service that simply returns the current time, formatted as a string.
Next, I create a view. A view is sort of like a razor page, except that we derive from the ViewBase class, which is part of my CG.Blazor library. I blogged about ViewBase previously, if it doesn’t sound familiar.
The entire page looks like this:
@page "/sample"
@inherits ViewBase<ISampleViewModel>

@using CG.Blazor.QuickStart.Plugin.ViewModels

<h1>Sample Page</h1>
<p>This razor page was loaded at runtime. It demonstrates the following:</p>
<ul>
    <li>The <code>CG.Blazor</code> library can easily load your Razor Class Library, as a plugin, at runtime.</li>
    <li>Plugins can have static resources, like style sheets and java scripts.</li>
    <li>Pages and components in a plugin route the same way standard Razor pages and components do.</li>
    <li>Pages can use the view-model extensions in <code>CG.Blazor</code> to improve testability and separation of concerns.</li>
    <li>Plugins can register services by implementing the <code>IModule</code> interface, in their own class.</li>
</ul>

<hr />

<h2>Example</h2>
<p>This button is colored using a class in the 'style.css' stylesheet, which is embedded inside the <code>CG.Blazor.QuickStart.Plugin</code>
   assembly. The stylesheet is dynamically injected into the HTML head using the <code>CG.Blazor</code> plugin extensions.
</p>

<button id="sampleButton" class="sampleButton" @onclick=@(() => ViewModel.Command.Execute(this))>@ViewModel.A</button>
<label for="sampleButton">@ViewModel.B</label>

<p>
    The button is bound to an <code>ICommand</code>, in a view-model, just like we're all familiar with. For this demonstration, that command calls a service to return the current time,
    thereby illustrating how views, view-models, services, scripts, stylsheets, and more, can all live together in the same plugin assembly - but still enjoy total isolation from the main web project, or any other plugins.
</p>
The interesting parts are at the top, and towards the bottom of the page. At the top, I start by adding the inherits tag, which tells Blazor I want to use the ViewModel class as the base class for this page. It also sets up a relationship between this view and the ISampleViewModel type. That type, ISampleViewModel, looks like this:
public interface ISampleViewModel : IViewModel
{
    ICommand Command { get; }
    string A { get; set; }
    string B { get; set; }
}
It derives from the IViewModel interface, which I covered in a previous blog post. Suffice to say, it’s a placeholder for a view-model that uses my MVVM extensions. Of course, there is also a corresponding SampleViewModel class, which looks like this:
public class SampleViewModel : ViewModelBase, ISampleViewModel
{
    protected SampleService _sampleService;
    protected string _a;
    protected string _b;

    protected ICommand _command;

    public string A
    {
        get { return _a; }
        set
        {
            SetValue(ref _a, value);
        }
    }

    public string B
    {
        get { return _b; }
        set
        {
            SetValue(ref _b, value);
        }
    }

    public ICommand Command { get; }

    public SampleViewModel(
        SampleService sampleService
        )
    {
        _sampleService = sampleService;

        A = "press me!";
        Command = new DelegateCommand(() =>
        {
            A = _sampleService.GetTimeNow();
            B = "<-- The time came from a service!";
        });
    }
}
In the SampleViewModel class we see the implementation of everything we previously saw in the ISampleViewModel inteface: the two properties and the command. The command handler, in the constructor, is interesting because this is where I’ll set the value of the A and B properties, using the SampleService reference. Every time the button is clicked, the command is executed, and the UI is updated as a result of changes to the properties on the view-model. Notice also, on the constructor, that Blazor will inject an instance of the SampleService service, which I’ll then store in the _sampleService field. That’s the same SampleService I registered in the Initialize method, on the Module class, remember that part?
Let’s go back to the view now, and see how we tie the button click back to the view-model:
<button id="sampleButton" class="sampleButton" @onclick=@(() => ViewModel.Command.Execute(this))>@ViewModel.A</button>

<label for="sampleButton">@ViewModel.B</label>
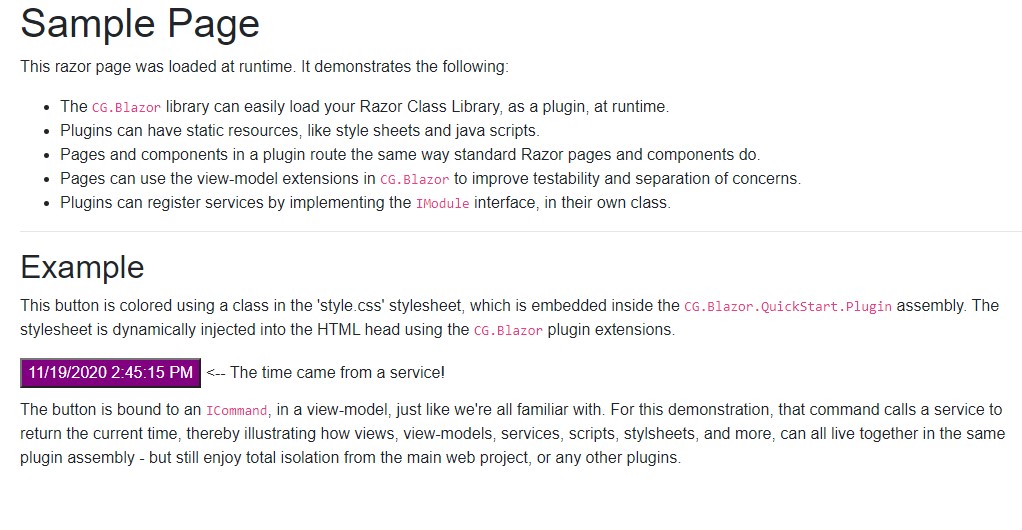
Here I have a standard HTML button with an onclick handler. In this case the handler is a delegate, tied back to the Command, on the view-model. The label, below the button, is using the B property on the view-model as well. The net effect here is, when the button is clicked, we’ll see the text of the button update, along with the label. It will look something like this:

The styling, for the button, comes from the fact that I used the sampleButton class, on the HTML tag:
<button id="sampleButton" class="sampleButton" @onclick=@(() => ViewModel.Command.Execute(this))>@ViewModel.A</button>
That class is tied back to a stylesheet that I included in the sample. Here is what that style sheet looks like:
.sampleButton {
    background-color: purple;
    color: white;
    margin-bottom: 10px;
}
That style sheet was injected into the HEAD element of the sample application’s HTML tag, by the Blazor plugin extensions that I outlined in the previous two blog entries. Here is what that stylesheet tag looks like, in the browser, with a rendered link and script tag:
<!DOCTYPE html>
<html lang="en">
<head>
    <link rel="stylesheet" href="_content/CG.Blazor.QuickStart.Plugin/styles/styles.css" />
    <script src="_content/CG.Blazor.QuickStart.Plugin/scripts/scripts.js"></script>

</head>
Those links, in the HEAD element, cause Blazor to reach out through the ManifetEmbeddedFileProvider obects that I added earlier, and read the style sheet and script from the plugin assembly.
If you really want to see the app work then I suggest downloading the project from Github HERE.
That’s about it. Obviously, it’s all a work in progress and I’ll probably make changes as I think of new things to add, or find bugs to squish. I hope you enjoy it. If you run across bugs please let me know. If you run across design flaws please let me know about those as well.
The source for CG.Blazor is available HERE. Note that the sample and plugin projects are part of the same GitHub repository, under the samples folder.
The NUGET package is available HERE.
Thanks for reading!
Photo by Neven Krcmarek on Unsplash


